Content found in this wiki may not reflect official Church information. See Terms of Use for more information.
Generate A WiFi Heatmap
Introduction
Do you have the right number of Wireless Access Points in your meetinghouse? Are they installed in a location to give you optimal coverage? This articles provides instructions for an inexpensive method to answer these questions.
The purpose of this guide is to enable FM groups (and their contractors), Stake/Ward Technology Specialists, and other local leaders to create a simple WiFi coverage map, commonly called a heatmap, to visualize the WiFi coverage quality within a meetinghouse or other Church facility. This heatmap can be useful in evaluating the quality of wireless coverage throughout your meetinghouse.
The App and Hardware
To build a heatmap of your meetinghouse, we will be using a mobile application named WiFiman (from Ubiquiti Inc.). You have two options for hardware:
1) Mobile phone running Android version 8 or higher
2) An Apple device running iOS 16 or later can be paired with a device called the WiFiman Wizard (sold by Ubiquiti Inc. for $99 USD as of this writing.) Apple restricts access to some of the data needed to generate a heatmap on it's own. The Wifiman Wizard will provide the needed data.
- To purchase a WiFiman Wizard directly from Ubiquiti, you can use one of the following links and choose your location from the country/region dropdown:
- United States: https://store.ui.com/us/en/products/wm-w
- Brazil: https://br.store.ui.com/br/pt/products/wm-w
- Mexico: https://mx.store.ui.com/mx/es/products/wm-w
The following instructions will be based mostly on the Android version of the WiFiman app, but the concepts are the same for the Apple version. Any differences will be noted herein.
The WiFiman app for Android can be installed from the Google Play app store from the following link:
https://play.google.com/store/apps/details?id=com.ubnt.usurvey&hl=en_US
If this link does not work in your region, go to the Google Play Store app on your mobile device and search for “WiFiman”.
The WiFiman app for Apple devices can be installed from the Apple App Store from this link:
https://apps.apple.com/us/app/ubiquiti-wifiman/id1385561119
If this link does not work in your region, go to the App Store app on your mobile device and search for “WiFiman”.
Install this app as you would any other. This app will need access to your device’s cameras, wireless radios, sensors and notifications. Allow any permissions that the application requests during its installation and the first time you run the application to assure that the app can do everything it will need to do to complete this task.
Running the WiFiman app and getting to know the interface
Before you start:
- Read through this entire set of instructions and familiarize yourself with the entire process.
- Make sure that you are inside the meetinghouse or facility you are going to test.
- Connect to the “Liahona” wireless network.
- Accept the Terms of Service on the splash page.
- Ensure that your device can access the internet.
- You might want to fully charge your device, as this procedure uses a large amount of battery power.
- Install the WiFiman app on your phone. The icon for this app looks like this:

(As previously mentioned, the first time this app is opened on a device, the app may request permissions to access certain functions or parts of your device’s hardware. Press the Allow or Accept button to grant these permissions. This should only need to be done once.)
For Apple devices using the WiFiman Wizard device: (Android users can skip to the next heading)
- The WiFiman wizard device should be removed from its box and placed inside the included white rubber cover as shown in the included visual instructions.
- The WiFiman device will need to be charged before use using the USB-C charging cable included in the box. Connect the charging cable to the USB-C port on the bottom of the WiFiman Wizard device and the other end to a USB-C power source (charging adapter is not included with the Wizard device). The device should be charged for at least 3 hours or until the indicator light on the device turns white, whichever happens first
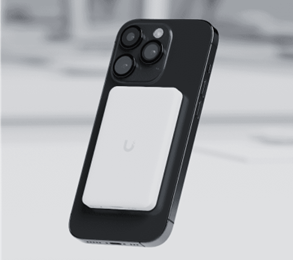
- For Apple iPhones that utilize Apple MagSafe technology, the rubber cover of the Wizard contains magnets that can be used to attach it directly to the back of the iPhone. Place the device on the back of the phone as shown:
- If your Apple device does not use MagSafe technology, place the device within 2 feet of the device
- Press the power button on the bottom of the Wizard device until the indicator light starts to blink white or goes solid white
- Open the WiFiman app on the Apple device. The app will ask you to accept or allow different access items, such as notifications, location, etc. Accept/allow all such prompts.
- Once the app is opened, and within a few seconds, the indicator light on the Wizard device should turn solid blue, the app should recognize the Wizard device and a pop up window should appear asking you to allow connection to the Wizard. Accept the connection request.
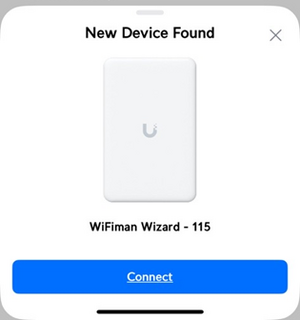
- Once accepted, another window will likely pop up asking to update the software on the wizard device:

- Press the Update Wizard button to allow the update
- Once updated, the Wizard is ready for use and you can continue on with the next step
Using the App to Generate a Heatmap
Once the app is loaded, you’ll see the “Speed” screen:
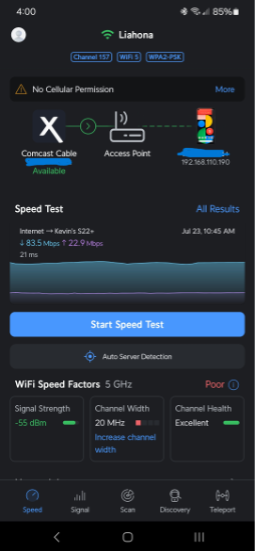
- If using the Android version: At the top of this screen, confirm that the network name shown is “Liahona”. Below the network name, you will see a blue box that says “Channel” followed by a number. This indicates the wireless channel that you are currently connected to. If the channel number is a number from 1-11, you are not connected correctly to the network for the purposes of this test. Move your phone closer to one of your building’s APs, turn off the WiFi radio on your device and turn it back on. Do this until the channel number is no longer between 1 and 11. Please note that this information will not be shown in this way when using the Apple version of the WiFiman app, so this step can be skipped on Apple devices.
- Once you are properly connected, select the Signal icon at the bottom of the screen. The Signal screen shows the strength of the WiFi signal that your device is receiving at its current location in real time. For our purposes of creating a heatmap, we will be using the Floor Plan function of the app.
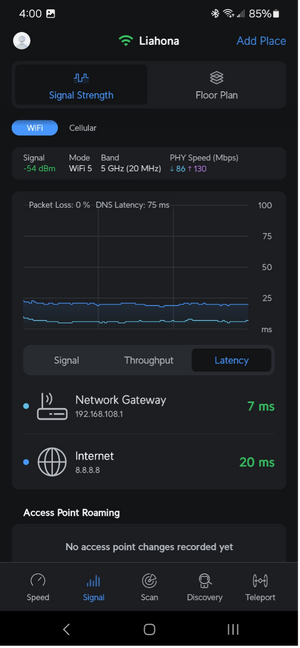
- Press the Floor Plan button at the top right of the signal screen to access the heatmapping tool. If this is the first time using WiFiman on this device, the only thing you will see on the Floor Map screen is a “Create New Scan” button. If you have already used the tool previously, you will see a list of all the previous scans you have taken, as shown here:
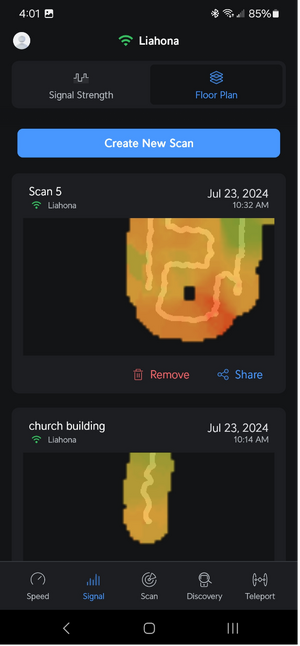
- Before starting a scan, move to a location in the building that you can later recognize once the map is created. Going to the end of a hallway at a specific corner of the building or going to the edge of one of the building’s foyers may be good places to start. Taking note of where you start your scan can help you orient yourself on the heatmap once the scan is complete. Also, a scan should ideally be done when the building is not occupied as the presence of other people can interfere with the scan.
- Once you are in your starting position, press the “Create New Scan” button to start your map. You will now walk through all the spaces in your building while the app detects and records the WiFi signal strength as you move. WiFiman uses your device’s camera, compass and gyroscope sensors to establish its position in space and generate the heatmap based on the measurements it records. These sensors must remain unobstructed for the duration of the scan. They also need time and patience to ensure they do not become disoriented. Please follow these recommendations as you scan your building:
- Hold your device at eye level, about 1 foot (30 cm) away from your face
- If possible, turn your device 90 degrees into what is commonly called “landscape” orientation.
- Once the scan is started, you will see the image seen by your device’s camera on the screen:

- Make sure that your fingers are not blocking your device’s camera.
- As you walk around the building, slowly point your device left and right as you walk. This “shows” your device all of the walls, ceilings and floors, allowing your device to maintain its orientation as you move.
- Walk slowly as you proceed around the building. You should walk slower than you are normally used to, around 1 step each second.
- All large meeting spaces should be scanned (Relief Society Room, Primary Room, High Council Room, etc.). When scanning individual rooms, you should enter and leave the room through the same door. Walking around the perimeter of the room will make it more recognizable on the finished heatmap.
- When scanning the largest spaces, such as the chapel and the cultural hall, walk the perimeter of the room but also cross the room, dividing it into thirds as you go.
- If possible, try not to backtrack over your own path as you move. This can confuse the WiFiman app and cause it to lose orientation, which can cause issues with the heatmap it generates.
- As you move around the building, a graphical representation of the developing heatmap will be shown on the screen. It will move from right to left even though you are walking forward. This is normal.
- If you have multiple APs in your building, you will periodically see a notification on your device indicating that your device has “roamed” from one AP to another. This is normal behavior. You should note where in the building you are when you receive these notifications for use later when interpreting the heatmap.
Completing your scan and Interpreting the heatmap
When you are finished walking your building, press the Stop Scan button to end your scanning session. The app will generate an image of your heatmap, which should look something like this:

Let’s take a closer look at this example heatmap and identify the elements it shows:
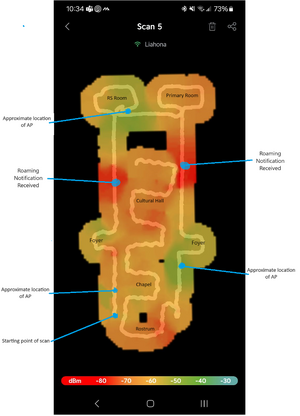
Based on the generated heatmap, the WiFi coverage in this building is in an overall acceptable state. There are several observations that we can make here which you can use as guides as you evaluate your own heatmap:
1- As you scan, you will notice that the scan “bubble” around you is fixed in size. Any areas in black, such as the pulpit in the chapel and the restrooms above the cultural hall in our example, indicate areas outside of the radius of the scan bubble. If there are such areas on your map that you need to know the signal strength for, you may need to do a new scan and walk closer to those areas.
2- In our example meetinghouse, there are 3 APs installed in the building. If possible, the person doing the scan should know the location of those APs to help explain the results on the map. Areas immediately around APs will have higher signal strength. This fact can help you determine if all APs are functioning appropriately.
3- Generally, any WiFi signal that is lower than -72dBm or so is considered unreliable. With respect to the heatmap, this means that anywhere the map shows areas of deep orange or red are possible areas of concern. In our case, the center of the cultural hall and the front of the rostrum may be places where WiFi signals could cause issues. In most cases, heatmaps are going to be predominantly yellow and light orange in color, like our example.
4- Notice in our example that there are two areas of red surrounding points where we received a notification from WiFiman that the device had “roamed” or connected to a different AP. In our case, the areas of red around the roaming notification points don’t indicate coverage problems since our scanning device was able to find a stronger AP to attach to. This is evidenced by the relatively small size of the red areas and the normal light orange/yellow colors on either side of them.
5- In our example, we did not have access to any bishop’s or clerk’s offices. We walked the open corridors. Make sure any areas you have coverage concerns about are accessible before starting your scan.
6- In some cases, the scanning device may become disoriented, and you will end up with a map that looks something like this:
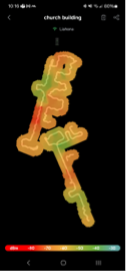
In this example, WiFiman became disoriented while moving around the Relief Society Room, which caused half of the map to be twisted out of alignment. If this occurs, you will need to redo your scan.
7- While it may seem counterintuitive, one thing you do not want to see in a meetinghouse is too much green and light blue. In WiFi, there is such a thing as “too much” coverage or “too many APs”. This signal oversaturation can cause just as many problems as having too few APs. In our example, it is reasonable to conclude that we have the appropriate amount of APs in this building.
8- It is ideal to perform a building WiFi scan when the building is unoccupied. Because of this, the heatmap generated by WiFiman represents the ideal signal conditions of a building. In our example case, there are no issues severe enough to indicate that the WiFi would be affected by occupancy enough to cause issues for users.
What can be done if there are obvious WiFi coverage problems?
As a result of your scan, and in conjunction with your own observations and/or the observations of other users, you may determine that there are WiFi coverage problems that need to be addressed. Here are some recommendations, listed in order from least impactful/costly to most impactful/expensive, as to what can be done to change the environment and improve WiFi quality and consistency in a facility:
1-The first option is to make sure that APs are mounted so that they are exposed to the occupied space of the building. In many cases, out of aesthetic, theft or other concerns, APs have been placed above the ceiling materials in the attic space of a building. By putting ceiling materials of any kind between an AP and the end user devices, signal strength will be reduced significantly. Simply mounting the APs below the ceiling can resolve many signal issues. In our example meetinghouse, all three of the APs are above the ceiling material. If they were to be moved out into the open, it is very likely that at least the weak signal in the Primary Room would be increased to a more reliable level.
2-Physically moving an AP closer to a coverage problem area may be enough to resolve an issue. In our example case, if we were to move the AP near the Relief Society Room a couple of meters closer to the Primary Room, we could resolve the Primary Room issue without sacrificing too much signal strength in the Relief Society Room, thus balancing the signal coverage more evenly.
3-As previously mentioned, there can be such a thing as “too many APs” in a building. The networking technology the Church provides allows the APs in a building to talk to and listen to each other. This enables the APs to change the signal power of their radios to try and maintain overall signal quality in the building, but this automation can only do so much. If your map shows areas of green with zones of red between them, you may have an oversaturation problem. In such cases, it may be helpful to physically disconnect one or more APs from the network temporarily to reduce the signal saturation. Once done, you can run another scan to see if the overall signal quality has improved. Remember, the majority of your map should be yellow or light orange.
4-If, after trying the above recommendations, additional scans still show coverage problems, it may be necessary to add additional APs to a building. APs are somewhat expensive, as is installing the cabling needed to support them, so adding new APs to a building is a decision that should not be taken lightly. If it is determined that additional APs are required, contact the FM group over the building. The FM group is responsible for the purchasing and installation of APs from the Church eMarket website or through other approved means. Local leaders should not try to supplement Church WiFi systems on their own, especially by trying to install consumer grade, non-Church approved WiFi devices in a meetinghouse or other Church facility. Doing so will cause further issues and will prevent Church technical support resources from being able to fully support the network in a building.