Content found in this wiki may not reflect official Church information. See Terms of Use for more information.
Assigning a Static IP
From TechWiki
Jump to navigationJump to search
> Meetinghouse Technology > Meetinghouse Networking
Most networks automatically assign IP addresses to newly added devices. This protocol is known as DHCP and is supported by the Meraki firewall. It is preferable that devices use DHCP when connecting to the network, but if this is not possible, a static IP address can be assigned to the device within Church Network Manager (CNM). Some devices may require a static IP address for remote management purposes. Follow the steps below.
STEP 1: LOG IN TO CHURCH NETWORK MANAGER (CNM)
- Visit CNM.ChurchofJesusChrist.org and log in using your Church Account username and password.
- Search for and click on the name of the desired property.
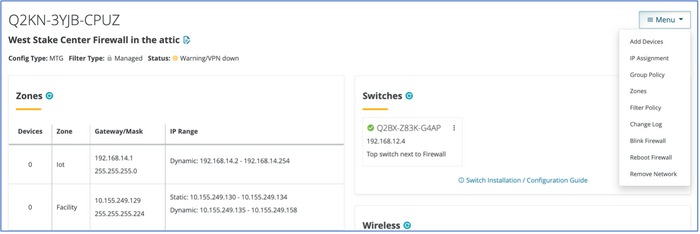
- Click on the serial number of the firewall (e.g. Q2KN-####-####).
- Click "Menu" on the far-right side of the screen. Then select IP Assignment.

STEP 2: ASSIGN STATIC IP ADDRESS TO THE DEVICE
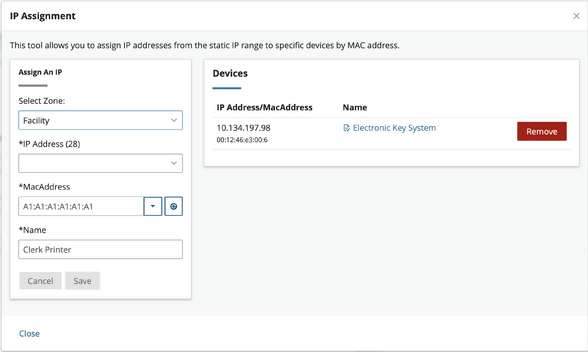
- Make sure the device is already connected to the correct zone on the network using the network settings in the device's setup configuration.
- At the top-left of the page, make sure the zone is set to the desired Zone: (Public, IoT or Facility)
- In the IP Address box, select a static IP address to assign to the device.
- Use the drop-down menu to find the MAC address of the device you want to assign. (It may take up to 15 minutes for this list to update with new device MAC addresses.)
- Enter a Name for the device assignment
- click Save.
- Complete! The device now has a static IP address on the network.

If you are having issues, please contact the Global Services Department (GSD) or email [MHT@ChurchofJesusChrist.org].